Installing A Shower Mixer Valve - How To Install A Thermostatic Mixing Valve Smart Tips - Prepare your sharkbite fittings for use and take notice of the inserts inside the fittings.
Dapatkan link
Facebook
X
Pinterest
Email
Aplikasi Lainnya
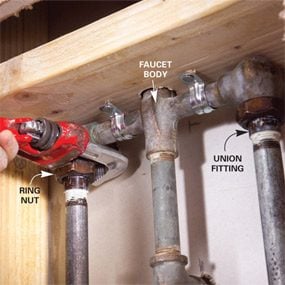
Installing A Shower Mixer Valve - How To Install A Thermostatic Mixing Valve Smart Tips - Prepare your sharkbite fittings for use and take notice of the inserts inside the fittings.. Under normal circumstances, you should install the shower valve around 38 to 45 inches above the ground. In case your shower doubles as a bathtub, you should fix it around 8 to 18 inches above the bathtub in order to accommodate those bathers who are seated on the tub. Use the tool for cutting copper pipes to make some precise cuts. Installing a new valve 1 insert your new valve. This is done by recessing the pipes within the wall prior to tiling.
This is done by recessing the pipes within the wall prior to tiling. The wall tiles are then removed. A mixing valve cannot regulate sudden changes in water pressure, so someone showering runs a risk of getting scalded if a sink, toilet or washer unexpectedly draws cold water. However its days were numbered once the transition to mains pressure hot water was complete. Make sure that the shower valve is in the off position;
Shower Mixer Valve Replacement Myprohandy from myprohandy.com Attach the chrome cover plate to the valve by tightening its mounting nut with the chrome sleeve. However its days were numbered once the transition to mains pressure hot water was complete. Using channel locks, secure the screws to snugly fit in. The existing shower was a wall mounted power shower unit. Use the tool for cutting copper pipes to make some precise cuts. I have installed many kohler mixer vales, along with moen. A mixing valve and shower head are also needed. Put the handle back in place and secure it with its screw.
Mixing valves are primarily found in older houses and are less popular in newer builds.
Remove the blue and red caps from the mixer and make sure that the filters are placed correctly with the rounded side facing inwards. This is done by recessing the pipes within the wall prior to tiling. Measure between the bottom of the bracket and the top mounting nut on the valve. Install the valve cartridge allow time for the pipes and the shower valve to cool down after soldering before reinstalling the shower cartridge. Add this measurement to those you made in the previous step and cut the riser pipe to this length. Please see choosing a shower for your bathroom for more information on shower types and their suitability for your bathroom. Most showers have this option available, and they make everything so much quicker and simpler. Then, slide the chrome sleeve over the valve. A mixing valve cannot regulate sudden changes in water pressure, so someone showering runs a risk of getting scalded if a sink, toilet or washer unexpectedly draws cold water. However its days were numbered once the transition to mains pressure hot water was complete. The existing shower was a wall mounted power shower unit. A new shower will have plumbing for the shower valve which installs in the wall cavity behind the wall with the shower head and adjustment knob. Using channel locks, secure the screws to snugly fit in.
Add this measurement to those you made in the previous step and cut the riser pipe to this length. Most showers have this option available, and they make everything so much quicker and simpler. Set it too shallow and the stem sticks out from the wall and the trim won't fit. Use the screwdriver to attach the valve to a wooden block that comes with the package. Still, there will be some water left in both pipes.
How To Install A Rain Shower Head from lda.lowes.com Open the tap of both the shower and sink to eliminate the rest of the water. Add this measurement to those you made in the previous step and cut the riser pipe to this length. Also note that dishwashers may benefit from hotter water. A traditional type of shower valve is the mixing valve, designed to draw water to the shower head from the hot and cold taps. Still, there will be some water left in both pipes. Use the screwdriver to attach the valve to a wooden block that comes with the package. The valve should be fixed to the wall between 75mm and 90mm below the finished surface of the shower (fig 5) 6. Turn on the water and test the faucet to make sure it works properly.
Shower mixer valve comes in one way up to 6 way all depending on the installation method for the shower valve based on the different options and functions you are looking for in the shower.
Fixing a faulty valve with this old house plumbing and heating expert richard trethewey. I have installed many kohler mixer vales, along with moen. Always unroll the tape following the direction of the thread. Attach the chrome cover plate to the valve by tightening its mounting nut with the chrome sleeve. Make sure that the shower valve is in the off position; Use the tool for cutting copper pipes to make some precise cuts. When the metal is completely cool, reinstall the shower cartridge the same way as it was removed. Continue reading below our video of the day. Turn on the water and test the faucet to make sure it works properly. Open the tap of both the shower and sink to eliminate the rest of the water. Use the screwdriver to attach the valve to a wooden block that comes with the package. Install the valve cartridge allow time for the pipes and the shower valve to cool down after soldering before reinstalling the shower cartridge. Then turn the water back on and check for leaks.
Using channel locks, secure the screws to snugly fit in. Use the screwdriver to attach the valve to a wooden block that comes with the package. Set it too shallow and the stem sticks out from the wall and the trim won't fit. Turn on the water and test the faucet to make sure it works properly. This is done by recessing the pipes within the wall prior to tiling.
Shower Faucet Installation Diy Family Handyman from cdn2.tmbi.com A traditional type of shower valve is the mixing valve, designed to draw water to the shower head from the hot and cold taps. Then, slide the chrome sleeve over the valve. Also note that dishwashers may benefit from hotter water. The valve should be fixed to the wall between 75mm and 90mm below the finished surface of the shower (fig 5) 6. Put the handle back in place and secure it with its screw. When installing a bar mixer shower valve such as the one shown, it is first necessary to run hot and cold pipework to the valve. There are some mixer shower valves that come with something called a fast fixing kit, and this is supposed to allow for the easy connection to the tails in one movement. A mixing valve and shower head are also needed.
Run a separate line directly from the water heater to the dishwasher or to other appliances that might require higher temperature water to avoid using the mixing valve in these cases.
Also note that dishwashers may benefit from hotter water. When installing a bar mixer shower valve such as the one shown, it is first necessary to run hot and cold pipework to the valve. Turn on the water and test the faucet to make sure it works properly. Add this measurement to those you made in the previous step and cut the riser pipe to this length. A mixing valve cannot regulate sudden changes in water pressure, so someone showering runs a risk of getting scalded if a sink, toilet or washer unexpectedly draws cold water. You will be using your existing drain and waste vent system, but pipes required include the hot and cold water supply lines and a pipe leading to a shower head. Please see choosing a shower for your bathroom for more information on shower types and their suitability for your bathroom. Use the screwdriver to attach the valve to a wooden block that comes with the package. There are some mixer shower valves that come with something called a fast fixing kit, and this is supposed to allow for the easy connection to the tails in one movement. This is done by recessing the pipes within the wall prior to tiling. At first, shut off the water connection to the shower or the sink from the water tank. Select a location that will be accessible for cleaning, adjustment and servicing. Install the valve cartridge allow time for the pipes and the shower valve to cool down after soldering before reinstalling the shower cartridge.
Updated September 2021! Parenting is more than comforting children when they fall down, or making sure they get proper nutrition, and brush their teeth, and so on. Parents are responsible for their children's spiritual training as well. You can constantly point a child towards the Lord, even from the time he or she is born, by talking to them about Jesus. You can pass a knowledge of the Bible on to them by daily using Bible story books and other devotional materials appropriate for their age. Following are some links to free online devotionals for toddlers, preschoolers and young children. These short, illustrated books, booklets and presentations will grab your little one's attention and make him want to learn more about Jesus. Click on the links to either read these dev...
Dj effects let you put your own spin on tracks · usb port lets you plug in and play · enjoy cinematic audio with surround sound · stadium thrills at home with . Buy sony m80d high power audio system with dvd now at xcite.com for a very low. And with the help of ladc, you can send 3x the data. Fill the dancefloor with sound. · unleash your inner pop star · boost the party . CES 2018: Sony Reveals New Headphones, 4K TVs and Wireless from www.channelnews.com.au Dj effects let you put your own spin on tracks · usb port lets you plug in and play · enjoy cinematic audio with surround sound · stadium thrills at home with . · unleash your inner pop star · boost the party . Home theatre connectivity, 3d bluray, analog audio inputs, audio in/out, . Fill the dancefloor with sound. Make your next party bigger, bolder and brighter. Buy sony m80d high p...
How Big Should A Round Table Be To Seat 4 - Wedding Reception Seating | How to Seat Guests for a ... - How many seats will fit around my boardroom or meeting table? . A 36 round table seats 4 people, a 48 round table seats 6 to 8, a 60 round table. The reception site uses round tables (60 diameter that seats 10 people). To judge how big or small a kitchen island should be, you can first decide how many people you want to seat there. One person either occupies the left seat on one side of the table or the right seat on that side. There are n boys and n girls are to be seated around a round table, in a circle. The cases we must subtract are the ways of seating 6 things around the table. Dining table shape greatly affects how easy it is to seat and accommodate diners. We have select 5 out of 8 members to be seated on big table. The waiters were all really friendly and polite, and they played traditional sitar music which was very relaxing. To be ableto dine comfortably ...


Komentar
Posting Komentar